How to disinfect electric beauty instruments at home is a practical hygiene question, not merely a beauty routine. Facial brushes, LED masks, microcurrent devices, and cleansing tools touch oil, makeup, sweat, and sometimes irritated skin. That residue can remain around silicone edges, charging ports, brush joints, and metal surfaces. A device may look clean while still carrying contamination.
Dermatologist Dr. Joshua Zeichner puts the principle simply: “Anything that touches your skin should be kept clean to reduce the risk of irritation and infection.” This advice matters because disinfection begins with the manufacturer’s instructions. Unplug the device first. Remove detachable heads when possible. Wipe washable surfaces with a suitable disinfectant, often 70% isopropyl alcohol, only when the manual permits it. Never soak an electric handle or flood a charging port. Let every part dry completely before storage or use.
Small details matter. A cotton swab can reach narrow seams. A clean, dry towel prevents fresh contamination. Do not share personal beauty devices. Replace worn brush heads and cracked silicone pieces. Some instructions remain unclear, and that is a real limitation. Alcohol may damage certain coatings, while household bleach can corrode sensitive components. When uncertain, checking the manufacturer’s support page is safer than guessing. This guide explains how to disinfect electric beauty instruments at home while balancing skin safety, device protection, and realistic household habits. Clean tools help. Careless moisture does not.
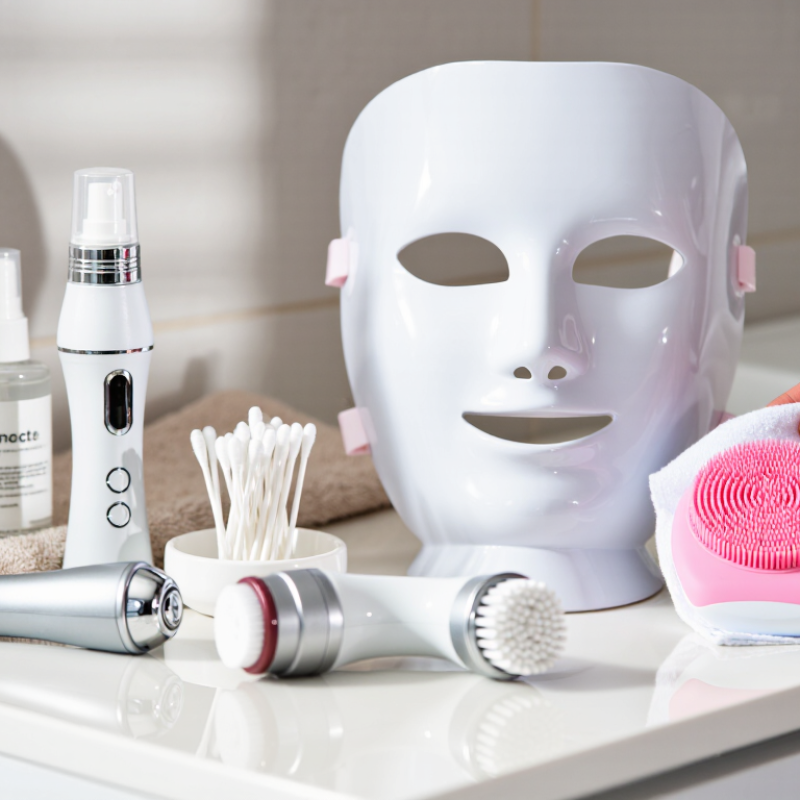
Types of Electric Beauty Instruments and Their Disinfection Needs
Electric beauty instruments do not share the same disinfection needs.
Cleansing brushes usually have silicone or soft bristles that collect oil, makeup, and skin cells. Remove the head when possible, wash it with mild soap, and rinse away residue. After cleaning, wipe compatible surfaces with 70% isopropyl alcohol. Let the head dry completely. Moisture can support microbial growth.
LED masks and microcurrent devices often contain charging ports, buttons, or delicate electrical parts. These surfaces need a lightly dampened disinfecting cloth, not immersion. Keep liquid away from openings. Facial steamers require special attention because their water tanks can develop buildup and odor. Empty the tank after use, rinse it, and follow the manual for descaling. Do not add disinfectants unless the instructions specifically allow them.
Epilators and facial trimmers contact hair, oil, and sometimes minor skin irritation. Detach removable parts and clean trapped debris with a small brush before disinfecting. Waterproof models may tolerate careful rinsing, but “water-resistant” does not always mean washable. Check the instructions. I once assumed a sealed-looking device was safe under running water; that assumption was careless. Clean shared instruments after every use, and never use damaged cords or cracked housings. No routine is perfect. Recheck corners, seams, and undersides, where residue often remains unseen.
Safety Checks Before Cleaning and Disinfecting
How to Disinfect Electric Beauty Instruments at Home?
Before cleaning an electric beauty instrument, unplug it completely. Remove detachable parts and take out the battery if the manual permits it. Never clean a warm, charging, or operating device. Check the user instructions for water resistance and approved disinfectants. A sealed housing is not automatically waterproof.
Inspect the cord, plug, charging port, buttons, and treatment head under bright light. Look for cracks, loose parts, exposed wires, rust, or unusual residue. Stop using the device if you notice damage. Moisture can enter through a tiny gap. That risk is easy to underestimate. A qualified technician should assess serious electrical or structural problems.
Protect your hands with suitable disposable gloves, and improve ventilation before applying any disinfectant. Confirm that the product is compatible with plastic, metal, silicone, and coated surfaces. Harsh chemicals may cause discoloration or weaken seals. Apply liquid to a cloth or wipe when the instructions advise against spraying. Do not immerse the main unit. Keep disinfectant away from sockets and charging contacts. Follow the stated contact time; wiping it away too soon may not provide effective disinfection. Let every part dry fully before reassembly or charging. A careful pause may feel unnecessary, but rushing this stage is one mistake worth reconsidering.
Step-by-Step Disinfection Process for Home Use
How to Disinfect Electric Beauty Instruments at Home?
Step-by-Step Disinfection Process for Home Use
Start with clean hands and a dry work surface. Unplug the instrument before touching its attachments. Check the user manual for cleaning limits. Some devices tolerate alcohol, while others may suffer surface damage. Remove detachable heads only when the instructions permit it. A rushed wipe can leave oil around seams and buttons.
Wipe away visible residue with a soft cloth slightly dampened with mild soap solution. Never pour liquid over the device. Keep moisture away from charging ports, switches, and ventilation openings. For compatible surfaces, apply a suitable disinfectant to a cloth, not directly to the instrument. A 70% alcohol solution is commonly used for hard, non-porous surfaces. Follow the product label’s contact time. It must remain visibly wet long enough to work.
Allow every part to air-dry completely. Do not reconnect the instrument while moisture remains. Wash removable, non-electric attachments separately if the manual allows rinsing. Dry them with a fresh towel, then inspect for cracks, cloudiness, or loose edges. Damaged surfaces can hold residue and should not be ignored. Store the clean instrument in a ventilated container, away from bathrooms and splashing water. Clean after each use, especially when the device touches oils, makeup, or broken skin. Do not share it before disinfection. It is easy to overuse alcohol, though; repeated exposure may weaken certain plastics and silicone. Check the material occasionally.
Drying, Reassembling, and Storing the Instrument
After disinfecting an electric beauty instrument, drying deserves as much attention as cleaning. Disconnect the power source and remove detachable parts only as the manual allows. Never submerge the motor housing, charging port, or sealed control panel. Use only a disinfectant approved for the surface, and follow its stated contact time. Wipe protected areas with a lightly damp cloth, then use a dry, lint-free towel. For removable heads, rinse only when approved. Shake away trapped water and place each piece on a clean towel. Good airflow matters. Avoid heaters and direct sunlight, which can warp plastic, weaken seals, or damage sensitive surfaces.
I have learned that “it looks dry” is not a reliable test. Moisture can hide inside a narrow socket or beneath a rubber ring. Leave components separated until they feel fully dry, often for several hours. A cool fan may help, but it should not blow dust directly onto the parts. Check for odor, cloudiness, rust-colored marks, or leftover residue before reassembly. If anything feels damp, wait longer. Do not force a head into place; resistance may indicate moisture, misalignment, or a damaged fitting.
Reassemble with clean, dry hands. Match every seal, cover, and attachment carefully. Store the instrument in a ventilated, dust-free case or drawer. Keep it away from sinks and damp bathrooms when possible. Do not wrap it tightly while warm or slightly wet. Store cords loosely, without sharp bends. Inspect the instrument before its next use. My routine is not perfect; I sometimes underestimate drying time. A simple check prevents that shortcut from becoming a repeated mistake.
After disinfecting an electric beauty instrument, allow all washable parts to air-dry completely before reassembly. Check seams and charging ports for moisture, reassemble only when dry, and store the instrument in a clean, dry place away from direct sunlight and humidity.
Common Mistakes That Can Damage Beauty Devices
Disinfecting an electric beauty instrument is not the same as washing a glass tool.
Unplug it first, remove detachable parts, and check the user manual for water resistance. In practice, the most damaging mistake is spraying liquid directly onto buttons, charging ports, or seams. Moisture can reach the circuit board and cause hidden corrosion. Keep it dry. Use a barely damp lint-free cloth on the handle, then wipe with an approved disinfectant compatible with the surface.
Skipping cleaning is another common error.
Skin oil, makeup, and protein can shield microbes from disinfectants. The CDC’s Guideline for Disinfection and Sterilization states that cleaning must occur before disinfection. Follow the product’s required contact time; wiping immediately may leave the surface inadequately treated. Avoid abrasive pads, boiling water, household bleach, and concentrated alcohol unless the manufacturer specifically permits them. These shortcuts can cloud plastic, weaken seals, or crack protective coatings.
The World Health Organization’s 2022 global infection prevention report estimates that healthcare-associated infections affect about 7% of patients in high-income countries and 15% in low- and middle-income countries.
Home devices are not hospital equipment, but the figure shows why surface hygiene deserves care. UV boxes also deserve skepticism; shadows and dirty attachments reduce exposure. Let every part dry completely before reassembly. I sometimes rushed this step myself. That was careless. Never share reusable heads without cleaning and disinfecting them between users. Replace damaged, swollen, or cracked components rather than trying to rescue them.
FAQS
Unplug it completely. Remove the battery if permitted. Let the device cool first. Check the manual and inspect the cord, buttons, ports, and treatment head.
Usually, no. Apply disinfectant to a suitable cloth instead. Keep liquid away from seams, charging ports, switches, and ventilation openings.
Use a soft cloth slightly dampened with mild soap solution. Clean visible residue before disinfecting. Dirt can shield microorganisms.
No. It is commonly suitable for hard, non-porous surfaces. Check material compatibility first. Repeated alcohol exposure may weaken plastic or silicone.
Follow the product label’s contact time. The surface may need to stay visibly wet. Wiping too soon can reduce effectiveness.
Remove them only when the instructions permit it. Wash non-electric parts separately if allowed. Dry them fully and inspect for cracks or loose edges.
No. Let every part air-dry completely. Do not recharge or reconnect it while moisture remains. Rushing feels efficient, but it is risky.
Stop if you find exposed wires, cracks, rust, loose parts, or unusual residue. Moisture can enter through a tiny gap. Serious damage needs qualified assessment.
Clean it after each use, especially after contact with oils, makeup, or broken skin. Do not share reusable heads before treatment.
No. Shadows, residue, and poor positioning can reduce exposure. Clean the attachment first. Do not treat ultraviolet exposure as a replacement for approved cleaning.
Conclusion
Learning how to disinfect electric beauty instruments at home begins with understanding that different devices require different care. Tools with removable heads, waterproof surfaces, or metal attachments may tolerate gentle cleaning, while devices with openings, charging ports, electrical connections, or delicate screens must never be submerged. Before cleaning, switch off and unplug the instrument, remove batteries when possible, inspect it for damage, and follow its basic safety instructions. A practical process includes removing visible residue, wiping compatible surfaces with a soft cloth and suitable disinfecting solution, and using a lightly dampened cotton swab for small areas without allowing liquid to enter the device.
After disinfection, let every part air-dry completely before reassembling or charging the instrument. Store it in a clean, dry, ventilated place away from heat and moisture. Avoid common mistakes such as soaking electrical components, using abrasive materials, spraying liquid directly into openings, applying excessive force, or operating the device while wet. These precautions explain how to disinfect electric beauty instruments at home safely while helping preserve their performance and service life.

 Kelli Beauty